
In a recent post about blogging and CSBlogs (http://goparker.com/post/2018-04-23-csblogs-and-blogging/) I mentioned that I have been playing around with using the static site generation tool Hugo (https://gohugo.io/) with GitHub Pages (https://pages.github.com/) as a means of hosting various websites at no cost.
Here I explain how it is done.
Static site generation is useful for sites that do not have dynamic content. That is to say that they don’t generate the view from querying a database or webservice.
For my blog, and http://threethinggame.com/, this is ideal as it can be hosted on GitHub Pages for free but it is still relatively easy to add posts and articles like it would be with something like Wordpress.
Now GitHub is mostly known for hosting git source control repositories and I was keen to be able to store the site’s source along with the generated public pages in the same repository. It just seemed neat. A while ago I found a description of how to do this on someone elses blog (https://www.hjdskes.nl/blog/update-deploying-hugo-on-personal-gh-pages/) and managed to set it all up. However, everytime I needed to do it again I could never find the URL and had to google it trying different keywords on the basis that I would recognise it when I saw it.
So in order to get around that problem, and because the instructions there referred to a non-windows environment, I thought that I would document my process here. Mostly for my own purposes but also to stand as an instruction for others.
To do all the following I am assuming that you have a GitHub account. You will also need to have Git command line tools installed (such as these https://git-scm.com/downloads).
Also you will need to install Hugo. To do this I first installed Chocolatey (https://chocolatey.org/install) using the following command prompt:
@"%SystemRoot%\System32\WindowsPowerShell\v1.0\powershell.exe" -NoProfile -InputFormat None -ExecutionPolicy Bypass -Command "iex ((New-Object System.Net.WebClient).DownloadString('https://chocolatey.org/install.ps1'))" && SET "PATH=%PATH%;%ALLUSERSPROFILE%\chocolatey\bin"
Once Chocolatey is installed you can use it to install Hugo using the command prompt:
choco install hugo -confirm
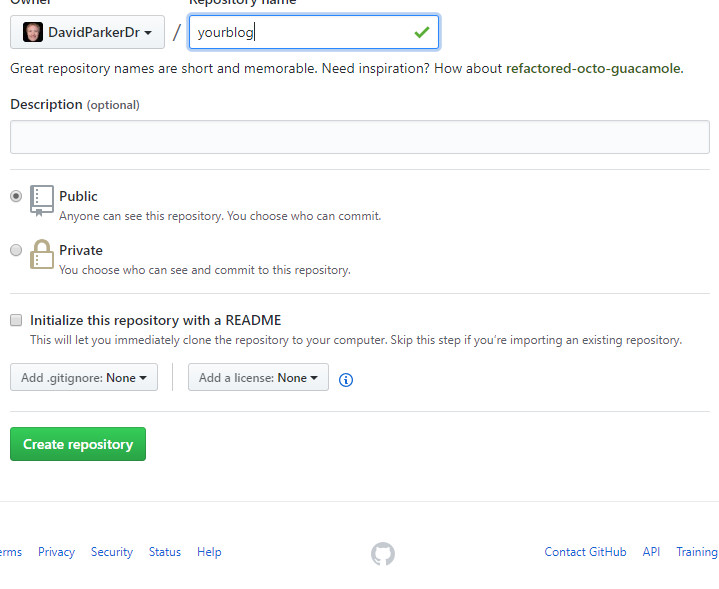
So the first step is to create new repository on GitHub. For this example I have called it “yourblog”.
You are going to want a folder to store the working copy somewhere on your PC. I created a folder called yourblog in the Documents folder but you could put it whereever you like.
Next, open a command prompt to that local folder.
When you created your repository it will have shown you the URL to the git file. You can use this to clone the repository in to your local folder:
git clone https://github.com/DavidParkerDr/yourblog.git .
The dot ('.', period) at the end of the command tells it to clone directly in to the current folder without making any new directories. You may get a warning as the repository is empty, but you can ignore this.
Next we need to make an initial commit in to that master branch and push it to the origin (the online copy).
git commit --allow-empty -m "Initial commit on master branch"

git push origin master
The master branch will store the public website files once they are all built. We want to have an additional branch to store all of the source files. I called this “source”. It seemed logical.
git checkout -B source
Next we want to do an initial commit on the source branch and push it to the origin.
git commit --allow-empty -m "Initial commit on source branch"

git push origin source
Next comes a little bit of wizardry that allows you to have a mixed of branches checked out at the same time. We do this so that we can build the site in to a public folder, and have it be mirrored in the master branch.
git worktree add -B master public origin/master
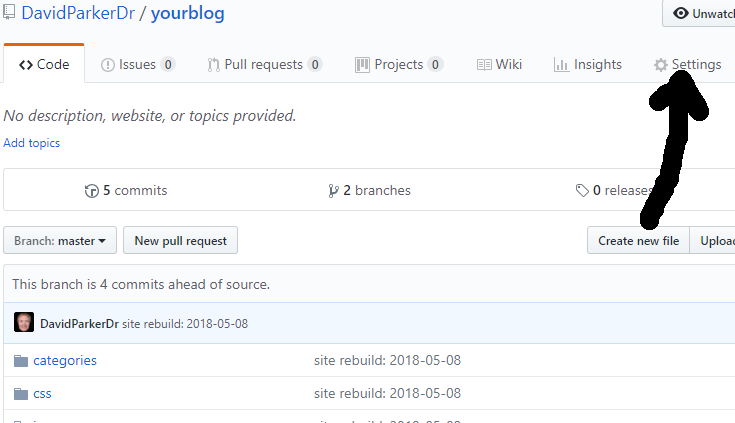
Now we need to visit the repository in the browser to configure it for use with GitHub Pages. Once you have navigated to the repository, click on settings link.
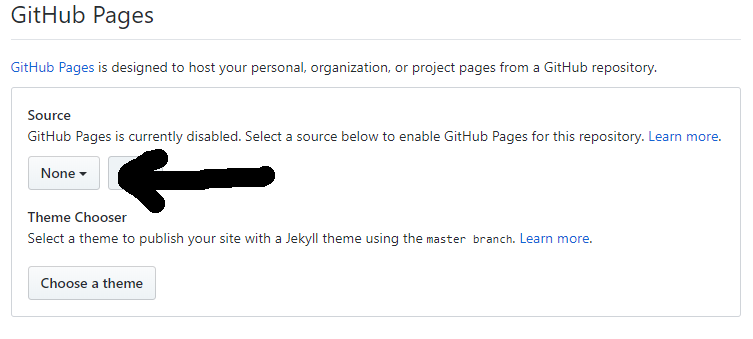
Scroll down to github pages section. By default it is disabled and set to “none”.
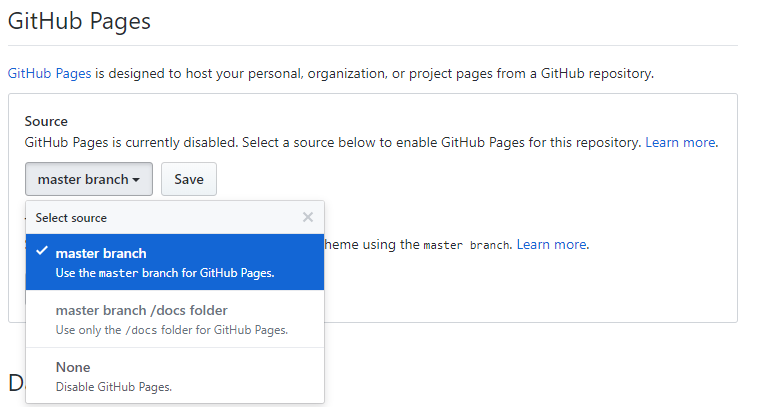
Select master branch from the combobox then click save.
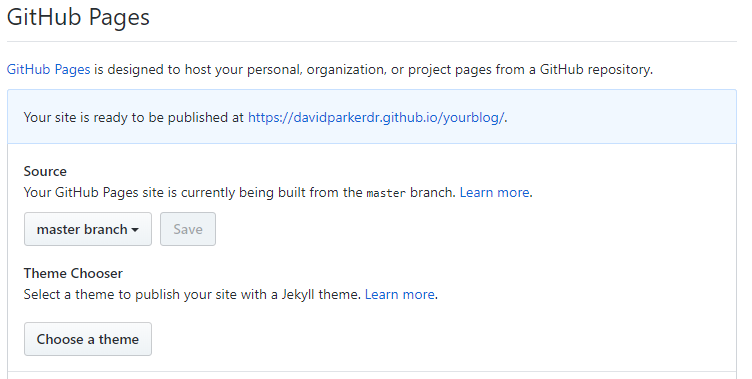
Now the GitHub Pages section will show the url of your new site which in my example is: https://davidparkerdr.github.io/yourblog/. You will need this later.
Now we are ready to create the site structure using Hugo. For this we are back in the command prompt.
hugo new site . --force
The dot creates the site in the current folder, and the –force parameter overrules hugo complaining about the non-empty folder that we are creating the site in.
The static site generator Hugo allows the use of themes to change the look and feel of the generated websites whilst keeping that all independent of the content (as it should be). There are long lists of available themes available at https://themes.gohugo.io/. The one that I picked was called Beautiful Hugo (https://themes.gohugo.io/beautifulhugo/) which I like because it is very clean and simple.
To add the theme we can use a git submodule so that we can update the theme if necessary.
git submodule add https://github.com/halogenica/beautifulhugo.git themes/beautifulhugo
The theme will now be in a new sub-folder called themes.
To get you up and running, the themes often have an exampleSite folder that you can copy and use as a basis for your site and explore its features. It is useful for getting a feel for the kind of things you can do and the consequences of making changes. You can copy it in to your source folder using the following command:
xcopy "themes/beautifulhugo/exampleSite" /S /Y
For reference, the /S parameter includes sub directories and contents and the /Y command automatically overwrites without needing the prompts.
In the root of your source folder now should be a file called config.toml. You should open it in a text editor. This file contains a bunch of the basic settings for your site. We just want to make a slight alteration to make sure that the URLs build properly in the pages.
On the first line is a field: baseurl = “https://username.github.io”. You need to replace it with the url from your GitHub Pages (remember I said that you would need it later, now is later).
baseurl = "https://davidparkerdr.github.io/yourblog/"
Additionally, under that baseurl, you will probably want to set the following:
RelativeURLs=true
CanonifyURLs=true
So, everything so far has been setup and only needs to be done once. The next step is one that you will repeat everytime that you make a change to your site, so I recommend that you create a batch file. I created a file called refresh.bat in my root source folder and then used a text editor to add the following commands to it.
for /f "skip=1" %%x in ('wmic os get localdatetime') do if not defined MyDate set MyDate=%%x
set today=%MyDate:~0,4%-%MyDate:~4,2%-%MyDate:~6,2%
set commitMessage="site rebuild: %today%"
echo %commitMessage%
echo "Removing the old website"
pushd public
git rm -rf *
popd

echo "Building the website"
hugo

echo "Pushing the updated \`public\` folder to the \`master\` branch"
pushd public
git add *
git commit -m %commitMessage%
popd
git push origin master
This batch of commands will generate the site contents from your source and then push them to the master branch. It is worth noting that you will need to do a git add and commit for any of the source files that you want to keep as the batch file only updates the master branch. This is particularly important if you are maintaining the site from multiple locations or it may become out of sync.
All of that should get you going. There is still plenty of extra stuff to learn about using Hugo, but that is way out of scope for this post which is already dragging on a bit. As a bit of a pointer, to add and edit posts on your site you need to use a text editor to edit the *.md Markdown files. Once you are happy with the changes, just run refreshSite.bat.
Note that there is a short delay before the GitHub Pages are updated, but your new site should be visible at the URL.
No comment
Say something
Thank you
Your post has been submitted and will be published once it has been approved.
OK
OOPS!
Your post has not been submitted. Please return to the page and try again. Thank You!
OK